Image Map
Showing posts with label Crafty fun. Show all posts

Saturday, October 11, 2014

Cute Fire Truck Craft...Step by Step!

I came across this cute fire truck craft as I was scouring Pinterest for a fun addition to Fire Safety week in my classroom.  You can click the image to bring you directly to the site.
I love how it is created using all simple shapes.  I thought it was absolutely perfect for Kindergarten, but the original blog post didn't include any sizes or many details (all you TRUE crafters out there probably like the freedom!), so I did some work to figure out exact dimensions of things to make this cute craft work.  Maybe you're like me and you're more "plan this thing out" than "fly by the seat of your pants".  I like to have a plan and I like to know exact details.  Since teaching is all about NOT re-creating the wheel, here are my step-by-step directions for making this Easy Shapes Fire Truck.

Step 1: Gather your materials.
The exact shapes and sizes I used are as follows:
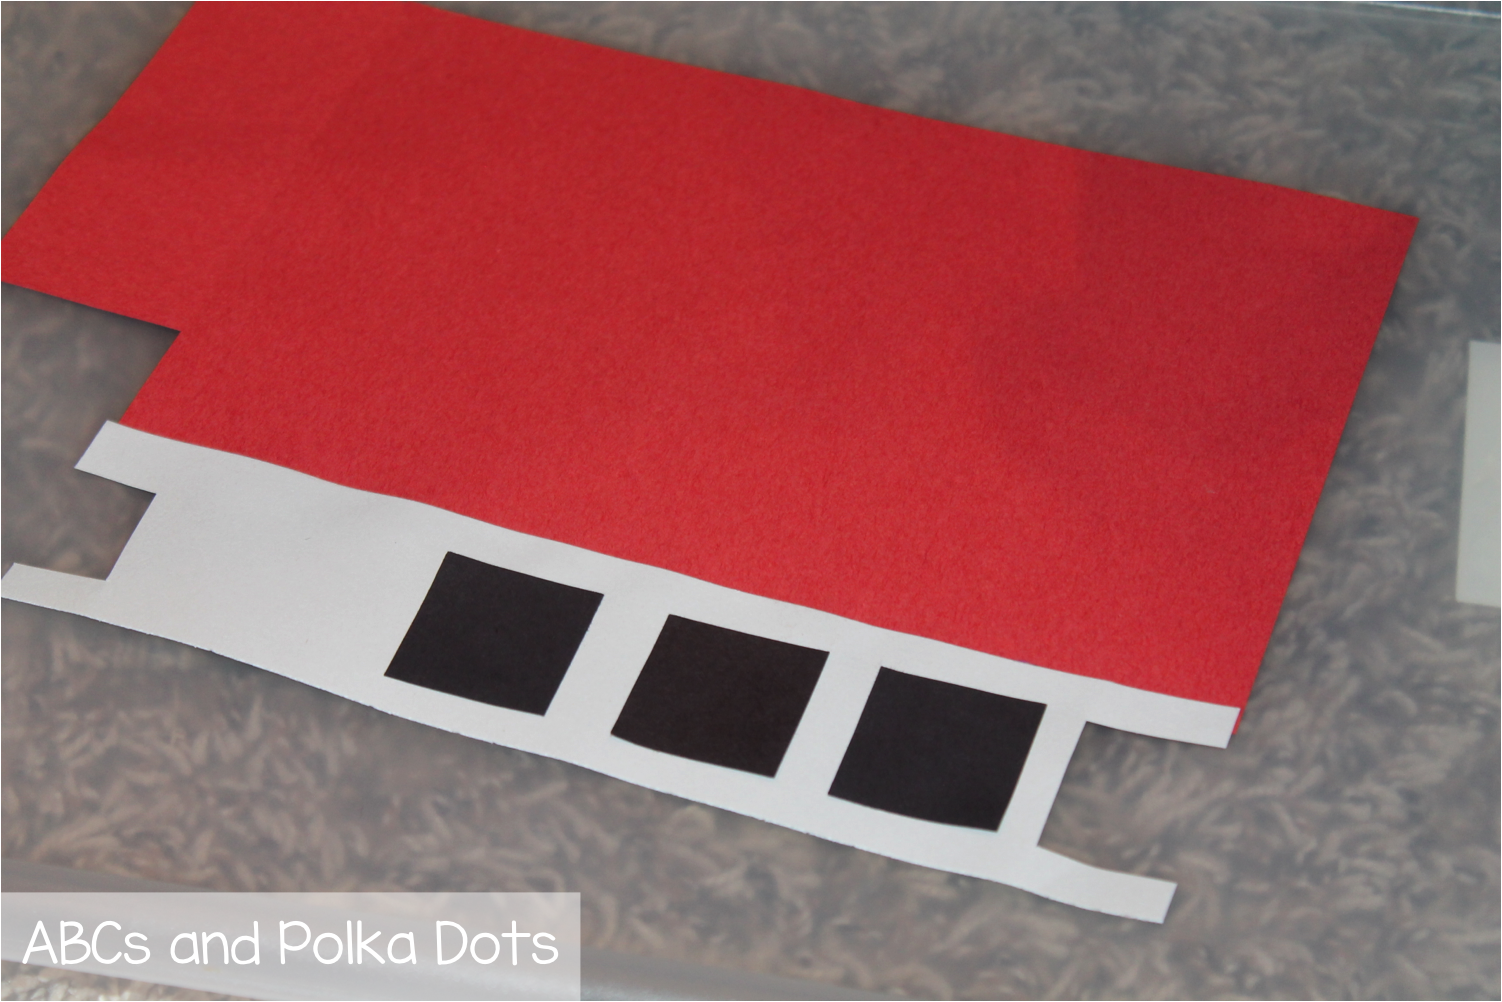
Large red rectangle - 6"x9" (cut a piece of construction paper in half)
Small red rectangle - 3"x4 1/2" (cut a piece of construction paper into fourths and then cut the fourths in half)
White rectangle - 2"x9" (you can make six of these from one piece of construction paper)
White square (4) - 1 1/2"
Black squares (4) - 1 1/4"
Large white circle - 1 1/2"
Black circles (4) - 1 1/2"
Small white circles (4) - 1/2"

(I used paper punches for all the small shapes -- the circles and the squares.  HERE is a link to one on Amazon.  This is the teeny tiny 1/2" one I have.  You can search and find just about any size you might need.  I love these for simplifying craft prep.  I've also gotten some of my paper punches at Hobby Lobby.)

Step 2: Glue the small and large red rectangles together to build the shape of the truck.
 Step 3: Add the ladder.
Begin turning the white rectangle into a ladder by trimming off part of each end.  Cut in near the top and bottom, and then cut across.
 Like this...
 Put glue only on the very bottom edge of the ladder and glue it to the top of the truck.
 Place the black squares on top to make it look just like a ladder.
 Glue them down.
 Step 4: Add the large white square as the window.
 Step 5: Add the wheels.  I used 1 1/2" circles because it's what I had, but larger would be totally fine.
 Step 6: Add the little white dots to the centers of the wheels.
 Step 7: Add the hose.
I made this part optional for my students.  Some of them thought it was SO COOL  to learn how to cut a spiral.  Some thought it seemed too tricky and chose to leave it off.  The finished product looks cute either way!
 You have a complete fire truck!
In my classroom, we added the word FIRE to the side, but it's super cute plain too.


To complete the craftivity in my classroom, we took a MAKING CONNECTIONS page that we had completed earlier in the week and added it underneath our fire trucks on a large black piece of paper.

I posted it with a tree map on firefighters that we had done as a class.
 Each one has it's own personality, but I think they turned out so cute!

CLICK HERE to go to my post about the MAKING CONNECTIONS page and to grab it from Google Drive.

This would be fun to make during a unit on Community Helpers or you can tuck it away for Fire Safety week next year.  OR you could still fit it in next week as a belated Fire Safety craftivity just because it's so adorable!

Happy crafting, my friends!!

Saturday, September 13, 2014

Star-shaped Crayons :: a tutorial

I had a thought last Spring that I would love to use all the broken crayons in my room and repurpose them into something fun for my students.  I saw the images of heart-shaped crayon valentines floating around Pinterest and knew that I could do something similar with stars that could be a really fun gift to give my new crew this year.  It really was so easy, and very fun!   
I ordered this star-shaped silicone mold from Amazon and it worked awesome!
I started with this tub of broken, peeled crayons.

For each new, star-shaped crayon, I chose which colors I wanted to use.  I tried to stay in the same color "family" for most of them, but a few I just threw in a random combination of colors.  Both ways seemed to work fine!  I chopped them into small pieces on a paper towel.
And then I filled the molds about half full.
I popped them into my oven which was preheated to 300 degrees.  I covered a cookie sheet with aluminum foil and them placed the silicone mold on top of that.  It provided a nice, firm surface for when I removed the melted crayons from the oven.  Most of the batches were in the oven for 8-10 minutes, but I just kept an eye on them and watched for when the crayons were completely (or almost completely) melted.
I let the hot, melted crayons sit on the counter for about 5 minutes before sticking them in the fridge to harden.  I left them in the fridge for an hour or so and then I took them out and carefully pulled the sides of the mold away from the crayons and popped them out.  Every one came out perfectly!  
So, so fun!!  My kids couldn't wait to check out each new batch.  No two crayons were exactly alike!

I set them out at my Open House had the students choose one to put in their pencil boxes as part of the scavenger hunt they did in the classroom that night.
I made this sign to put by the crayons.
It has been so much fun watching my students use these crayons at school during the first weeks!  They are big and chunky and will last forever!
This really was a super fun, inexpensive, and EASY thing to do!  Pretty sure I'll be doing it again and again...I want to check out different shapes too! :)